


1. Introduction
- CV Intranet is a SharePoint-based internal platform designed to enhance communication, collaboration, and productivity across the organization. It serves as a centralized hub where employees can access company news, announcements, policies, and important resources in one place.
- The platform enables teams to stay connected by sharing updates, managing documents, and collaborating on projects efficiently. Managers and administrators can publish information, streamline workflows, and ensure employees have easy access to the tools and data they need.
- This user manual provides comprehensive guidance on configuring all CV Intranet modules and features. The focus is on admin configuration points to enable proper customization and management of the intranet environment.
2. User Roles
- Admin Role (Full Control)
- Employee Role (Normal User)
3. CV Navigation
- CV Navigation is application customizer which apply custom branding with top navigation menu throughout the site. Configure the navigation structure and layout to control how users navigate the intranet.
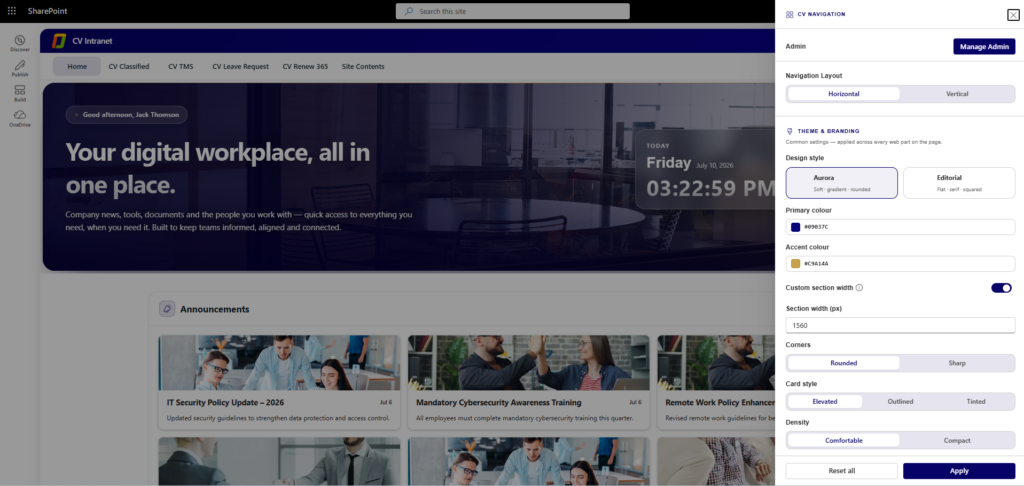
- Admin
- Click the gear icon on the web part to open its settings panel, then use Manage Admin to add or remove administrators for this web part.
- Navigation Layout
- Arrange Top navigation menu as any directional Horizontal or Vertical side menu.
- Theme & Branding (This setting will be applying all webparts)
- Design Style: Choose from Aurora (soft, gradient, rounded) or Editorial (flat, sans-serif, squared) themes.
- Primary Colour: Set the primary brand color for the intranet.
- Accent Colour: Set the accent color for highlights and CTAs.
- Section Width & Layout
- Custom Section Width: Enable or disable custom section widths.
- Section Width (px): Set the width in pixels for consistent layout.
- Card Styling
- Card Style: Choose from Elevated, Outlined, or Tinted card styles.
- Corners: Set card corners as Rounded or Sharp.
- Density: Choose from Comfortable or Compact spacing.
4. CV Banner
- The banner is the primary visual element at the top of the intranet homepage. Customize it with welcome messages to greet employees.
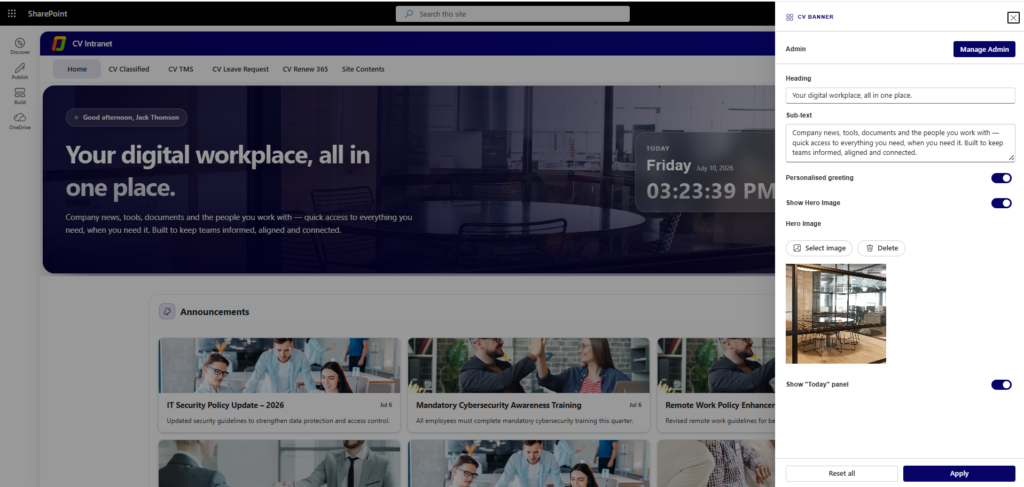
- Admin
- Click the gear icon on the web part to open its settings panel, then use Manage Admin to add or remove administrators for this web part.
- Heading & Sub-text
- Heading: Set the main welcome message title displayed on the banner.
- Sub-text: Add the supporting description text shown below the heading.
- Personalised Greeting
- Toggle on to show a username-based greeting message on the banner (e.g., “Good afternoon, Jack Thomson”).
- Hero Image
- Show Hero Image: Toggle on to display a background image behind the banner text.
- Select Image / Delete: Upload a new hero background image or remove the current one.
- Today Panel
- Show “Today” Panel: Toggle on to display the live date and time panel on the right side of the banner.
5. CV Announcements
- Keep employees informed by managing and displaying company announcements with titles, short descriptions, Long description (HTML Support), publish dates, and expiry controls.
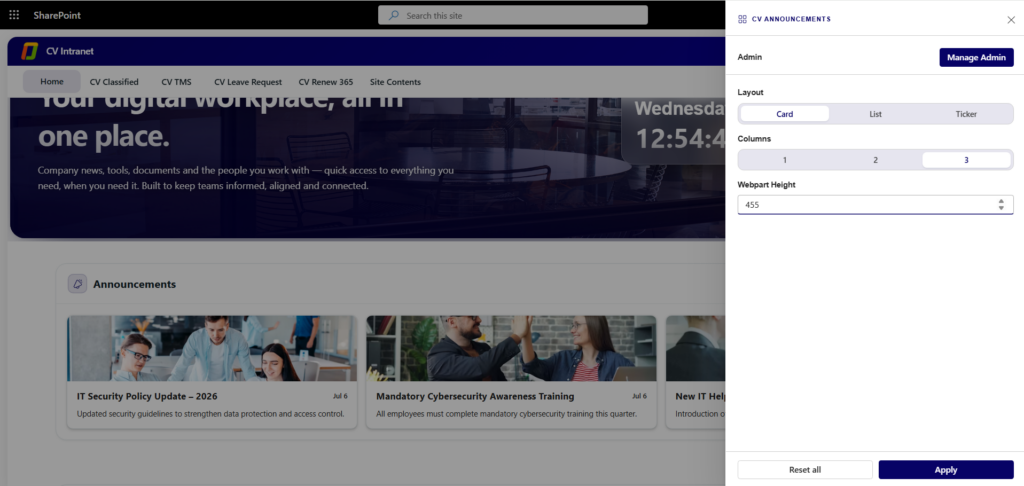
- Admin
- Click the gear icon on the web part to open its settings panel, then use Manage Admin to add or remove administrators for this web part.
- Layout
- Choose how announcements are displayed: Card, List, or Ticker.
- Card – Displays each announcement as a separate card with a clean, visually appealing design.
- List – Shows announcements in a simple vertical list for easy reading.
- Ticker – Displays announcements in a scrolling ticker, ideal for highlighting important updates or breaking news.
- Choose how announcements are displayed: Card, List, or Ticker.
- Columns
- Select 1, 2, or 3 columns to control how many announcements appear in each row.
- Webpart Height
- Set the height (in pixels) of the announcements section to control how many announcements are visible before scrolling.
6. CV Quick Links
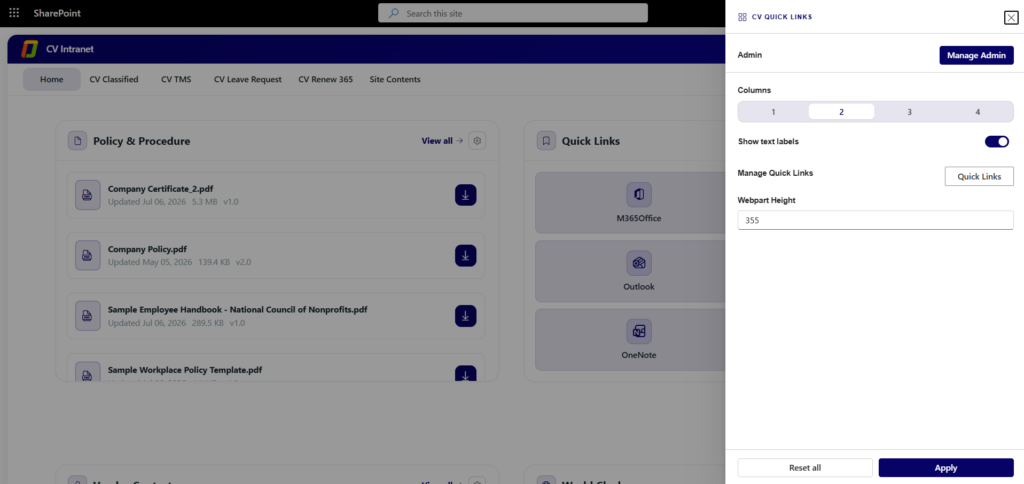
- Admin
- Click the gear icon on the web part to open its settings panel, then use Manage Admin to add or remove administrators for this web part.
- Columns
- Select 1, 2, 3, or 4 columns to control how many quick link tiles appear in each row.
- Show Text Labels
- Toggle on to display the link name below each icon; toggle off to show icons only.
- Manage Quick Links
- Click the Quick Links button to open the list where items can be added, edited, or deleted.
- For each link, configure: Name, URL, Icon, and display Order.
- Webpart Height
- Set the height (in pixels) of the Quick Links section.
7. CV Policy Procedure
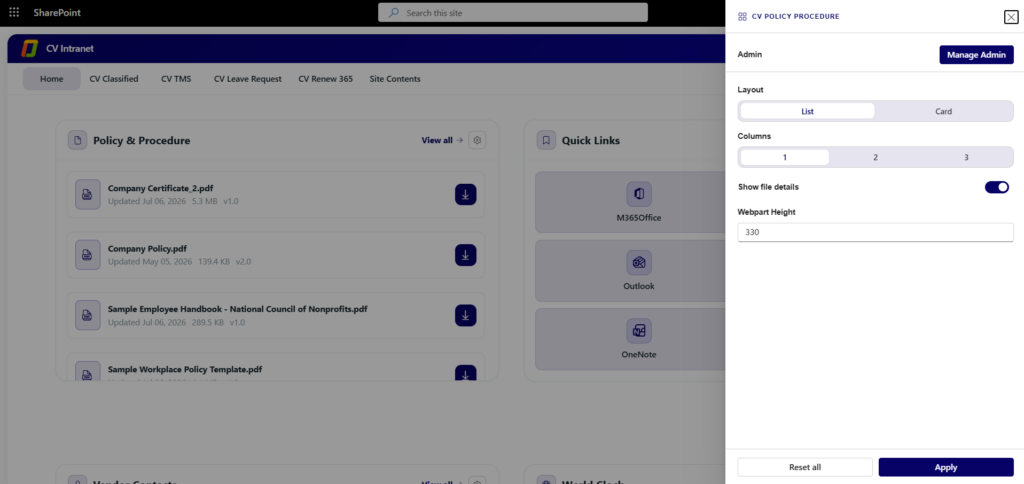
- Centralize company policy and procedure documents (PDFs, handbooks, templates) in one place so employees can easily find and download the latest compliance and HR files.
- Admin
- Click the gear icon on the web part to open its settings panel, then use Manage Admin to add or remove administrators for this web part.
- Layout
- Choose List or Card to change how policy documents are displayed.
- Columns
- Select 1, 2, or 3 columns to control how many documents appear in each row.
- Show File Details
- Toggle on to display file metadata (last updated date, size, and version) below each document.
- Webpart Height
- Set the height (in pixels) of the Policy & Procedure section.
8. CV Vendor Contacts
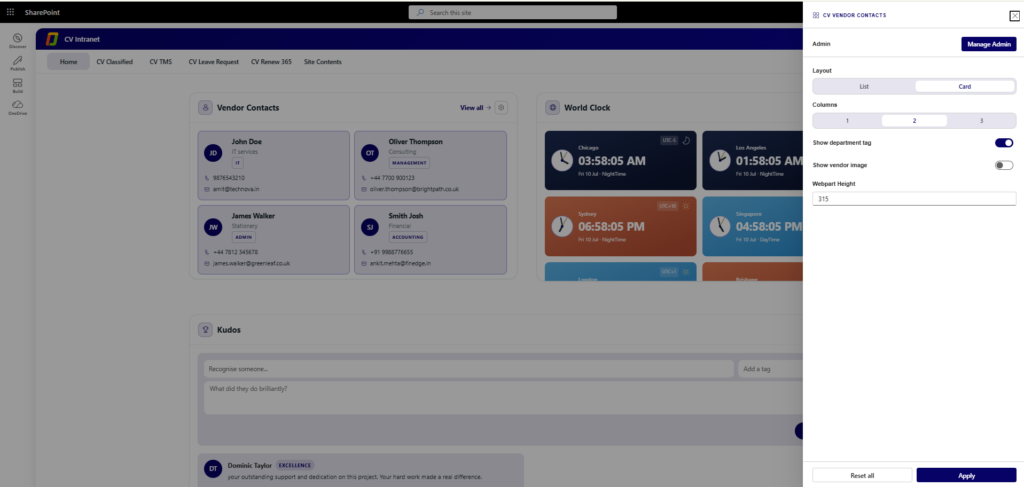
- Give employees a quick, searchable directory of external vendor and partner contacts, complete with department, designation, and contact details, so they always know who to reach out to.
- Admin
- Click the gear icon on the web part to open its settings panel, then use Manage Admin to add or remove administrators for this web part.
- Layout
- Choose List or Card to change how vendor contacts are displayed.
- Columns
- Select 1, 2, or 3 columns to control how many vendor cards appear in each row.
- Show Department Tag
- Toggle on to display each vendor’s department or category tag on their card.
- Show Vendor Image
- Toggle on to display the vendor’s profile photo; toggle off to show initials only.
- Webpart Height
- Set the height (in pixels) of the Vendor Contacts section.
9. CV World Clock
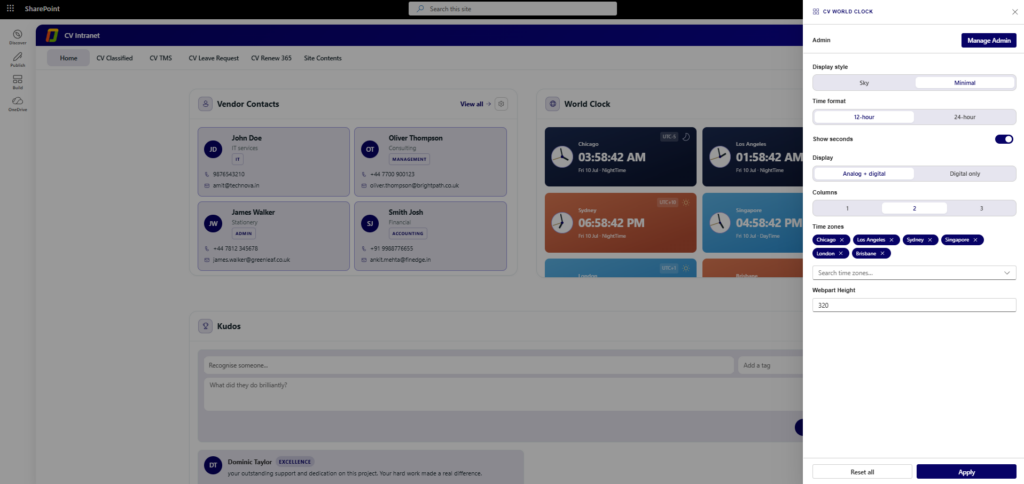
- Display live clocks for multiple global time zones side by side, helping distributed teams see at a glance what time it is for their colleagues and plan meetings across regions.
- Admin
- Click the gear icon on the web part to open its settings panel, then use Manage Admin to add or remove administrators for this web part.
- Display Style
- Choose Sky (colour-coded by day/night) or Minimal to change the visual theme of each clock card.
- Time Format
- 12-hour: Display time in 12-hour format (with AM/PM).
- 24-hour: Display time in 24-hour format.
- Show Seconds
- Toggle on to display seconds alongside hours and minutes on each clock.
- Display
- Choose Analog + Digital to show both clock faces, or Digital Only to show just the time text.
- Columns
- Select 1, 2, or 3 columns to control how many clock cards appear in each row.
- Time Zones
- Use the search box to find and add a city or time zone; it appears as a tag and a live clock card.
- Click the x on a time zone tag to remove it from the display.
- Webpart Height
- Set the height (in pixels) of the World Clock section.
10. CV Kudos
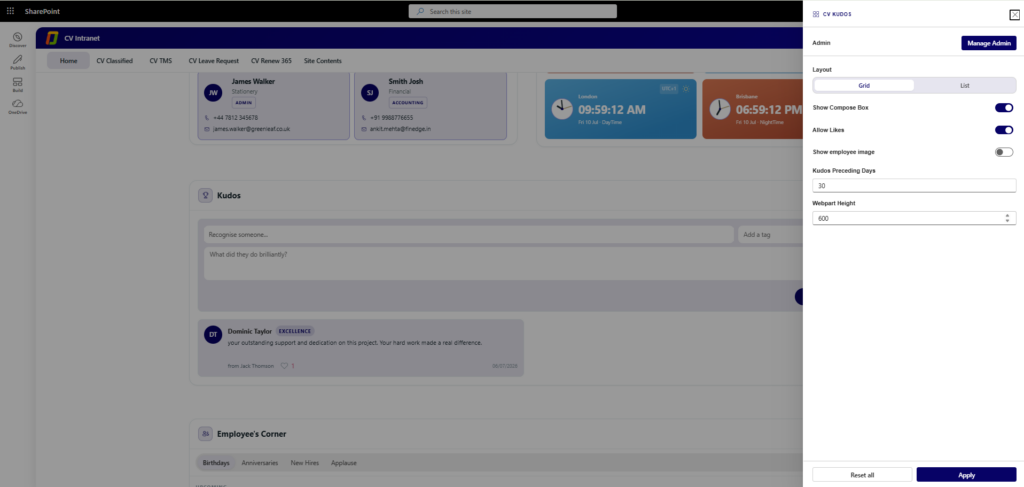
- Let employees publicly recognize and celebrate colleagues for great work. Anyone can post a kudos message calling out what someone did well, and the whole team can like it.
- Admin
- Click the gear icon on the web part to open its settings panel, then use Manage Admin to add or remove administrators for this web part.
- Layout
- Grid: Display kudos in a grid/tile layout.
- List: Display kudos in a list format.
- Display Options
- Show Compose Box: Toggle on to let employees post a new kudos message directly from the web part.
- Allow Likes: Enable or disable the ability to like kudos messages.
- Show Employee Image: Display or hide employee profile images with kudos.
- Kudos Preceding Days
- Set how many days of past kudos remain visible in the feed (e.g., 30 days).
- Webpart Height
- Set the height (in pixels) of the Kudos section (e.g., 600px).
11. CV Employee Corner
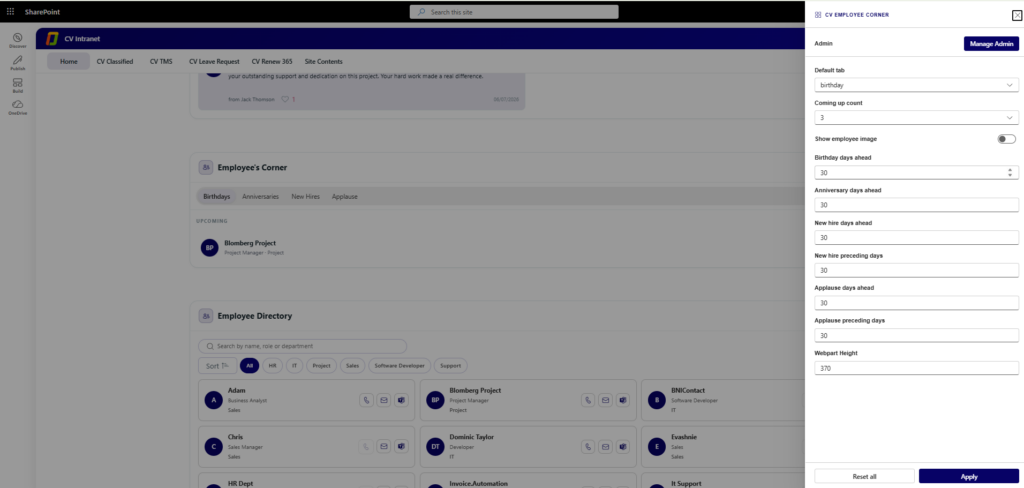
- Bring the team’s key moments into one tabbed view — upcoming birthdays, work anniversaries, new hires, and applause/recognition shout-outs — so employees never miss a chance to celebrate a colleague.
- Admin
- Click the gear icon on the web part to open its settings panel, then use Manage Admin to add or remove administrators for this web part.
- Default Tab
- Select which tab is shown by default when the web part loads: Birthday, Anniversaries, New Hires, or Applause.
- Coming Up Count
- Set the number of upcoming items shown under each tab (e.g., 3 upcoming items).
- Show Employee Image
- Toggle on to display employee profile images across all tabs.
- Show Applause
- Toggle on to show the Applause tab; toggle off to hide it and remove applause/recognition entries from the web part.
- WebPart Data Configuration
- Birthday Days Ahead: Define how many upcoming days of birthdays are displayed (e.g., 30 days).
- Anniversary Days Ahead: Define how many upcoming days of anniversaries are displayed (e.g., 30 days).
- New Hire Days Ahead: Define how many upcoming days of new joiners are displayed (e.g., 30 days).
- New Hire Preceding Days: Keep recently joined employees visible for a set number of past days (e.g., 30 days).
- Applause Days Ahead: Define how many upcoming days of applause/recognition entries are displayed (e.g., 30 days).
- Applause Preceding Days: Keep past applause/recognition entries visible for a set number of past days (e.g., 30 days).
- Webpart Height
- Set the height (in pixels) of the Employee Corner section (e.g., 370px).
12. CV Employee Directory
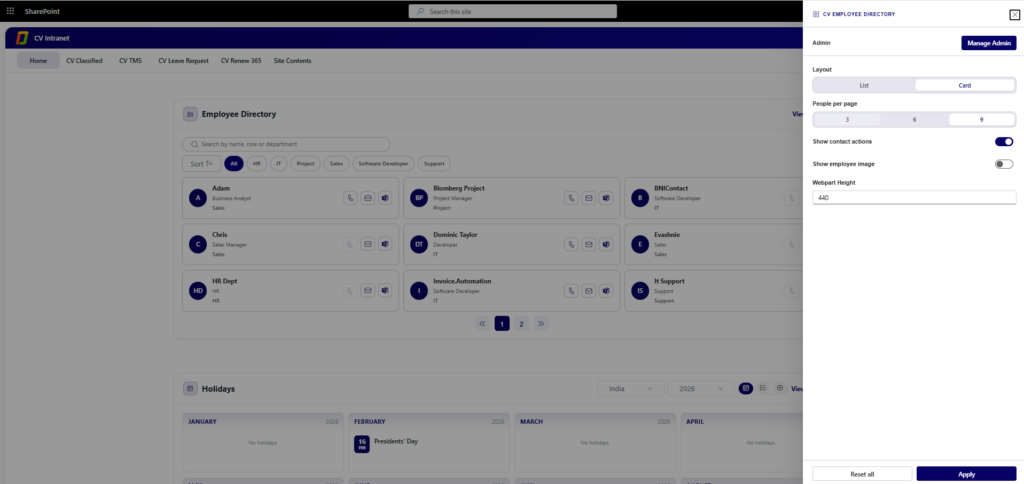
- Give employees a searchable, paginated directory of all staff, with profiles synced from Azure AD and SharePoint, so they can quickly find a colleague’s role, department, and contact details.
- Admin
- Click the gear icon on the web part to open its settings panel, then use Manage Admin to add or remove administrators for this web part.
- Layout
- Choose List or Card to change how employee entries are displayed.
- People Per Page
- Select 3, 6, or 9 to control how many employee entries appear per page.
- Show Contact Actions
- Toggle on to show quick-contact icons (call, email, Teams chat) on each employee entry.
- Show Employee Image
- Toggle on to display employee profile images; toggle off to show initials only.
- Webpart Height
- Set the height (in pixels) of the Employee Directory section.
13. CV Holidays
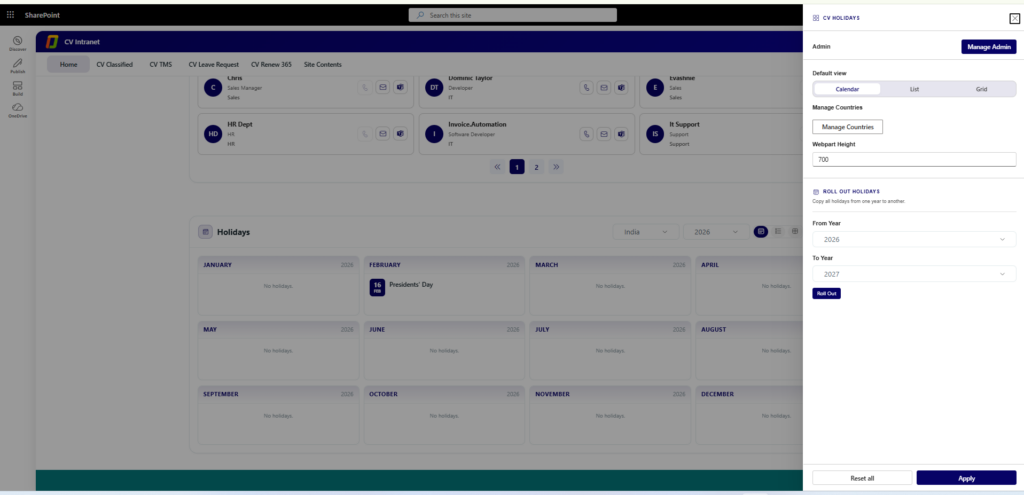
- Display a visual company holiday calendar, organized by country and month, so employees always know which days are official holidays.
- Admin
- Click the gear icon on the web part to open its settings panel, then use Manage Admin to add or remove administrators for this web part.
- Default View
- Calendar: Display holidays in a month-by-month calendar view.
- List: Display holidays as a simple chronological list.
- Grid: Display holidays in a grid/tile format.
- Manage Countries
- Click Manage Countries to add or remove the countries included in the holiday calendar.
- Webpart Height
- Set the height (in pixels) of the Holidays section (e.g., 700px).
- Roll Out Holidays
- Select a From Year and To Year, then click Roll Out to copy all holidays from one year to the next.
- This streamlines holiday calendar management for upcoming years.