+1 (408) 900-9133
1. Overview
- CV Leave Request is a SharePoint SPFx web part that enables organizations to manage the full employee leave lifecycle — from applying for leave, This guide walks through the installation tracks, tracking leave balances by category (casual, sick, earned, etc.), and maintaining a single source of truth for holidays, policies, and audit history — all inside Microsoft SharePoint Online.
- This guide walks through the installation tracks required for a complete deployment:
-
- SharePoint App Deployment — adding the CV Leave Request web part to your tenant and target site.
- AppSource Subscription — activating a paid plan so the web part runs without feature restrictions.
-
2. Prequisites
- Before starting the deployment, confirm the following are in place:
- SharePoint environment: Microsoft 365 tenant with SharePoint Online and App Catalog enabled.
- App Catalog site: A tenant-level or site collection App Catalog must be created and accessible.
- Admin access: Global Administrator or SharePoint Administrator rights are required for approving tenant-level deployment and forAPI permissions.
- Billing account: A valid payment method on the Microsoft account used to activate the
AppSource subscription.
Part 1 — Deploy the CV Leave Request SharePoint App
- Follow these steps in order. Each step assumes the previous step completed successfully.
-
Step 1: Deploy the Solution (Admin)
- Open the tenant or site-collection App Catalog using one of the following URLs:
- https://yourtenant.sharepoint.com/sites/appcatalog/_layouts/15/tenantAppCatalog.aspx/manageApps
- or
- https://yourtenant.sharepoint.com/sites/yoursitecollection/AppCatalog/Forms/AllItems.aspx
- Click the settings (gear) icon in the top-right corner and choose Add an app.
- In the search bar, type “CV Leave Request” and locate the app under the SharePoint
Store section. - Select CV Leave Request and click Add to Apps site.
- In the deployment dialog, choose either “Only enable this app” (to add it to specific sites later) or “Enable this app and add it to all sites”, then click Add.
- A banner will appear requesting additional API permission approval. Proceed to Step 2 to grant these permissions.
-
Step 2: Grant API Access
- CV Leave Request requires delegated Microsoft Graph permissions to read user profiles (for approver lookups and employee details).
- Open the SharePoint Admin Center: https://yourtenant-admin.sharepoint.com
- From the left menu, navigate to Advanced → API access.
- Under Pending requests, locate the following permission requests submitted by CV Leave Request:
- a. User.Read.All – resolve manager and approver names from Azure AD
- Select permission and click Approve. Approval can take a few minutes to propagate.
-
Step 3: Add the App to a SharePoint Site
- Note: Skip this step if you selected “Enable this app and add it to all sites”
- Navigate to the target SharePoint site collection (for example, your HR portal).
- Open Site Contents from the site settings menu.
- Click + New → App in the top ribbon.
- Under Apps You Can Add, select CV Leave Request and click Add.
Part 2 — Configure the CV Leave Request Web Part
- Once the app is installed, add the web part to a SharePoint page so employees and managers can interact with it.
-
Step 1: Create the Leave Request Page
- From the target site, go to Site Contents → New → Page.
- Select a blank page template and give it a clear title such as “Leave Management” or “Apply for Leave.”
- Add a full-width section (recommended) so the leave dashboard renders with enough horizontal space for the request table and calendar view.
-
Step 2: Add the Web Part
- Click the + icon inside the section to open the web-part picker.
- Search for “CV Leave Request” and click the result. Wait a few seconds for the web part to initialize.
-
Step 3: Add configuration set up from settings tab
-
Step 4: Test and Publish
- Click Publish in the top-right of the page to make it available to all users.
- Optionally add the page to the site’s top navigation for easy discovery.
Part 3 — Purchase the CV Leave Request Subscription
- A free trial of CV Leave Request runs with limited capacity. To unlock unlimited users leave requests, approval workflows, and all leave categories, activate a paid subscription through Microsoft AppSource.
-
Step 1: Open the Product on AppSource
- Go to Microsoft AppSource and search for “CV Leave Request” under SaaS products,
or use the direct product link provided by Codevision Technologies. - On the product page, click Get it now.

-
Step 2: Select Billing Country
- You will be redirected to the Microsoft Marketplace checkout.
- Choose your Billing Country/Region from the dropdown. This must match your organization’s registered address.

-
Step 3: Choose a Subscription Plan
- CV Leave Request offers the following plan tiers (pricing is billed per tenant, not per user):
- Monthly — month-to-month billing, ideal for organizations evaluating long-term fit.
- Yearly — annual billing with a discount over the monthly rate; best for production rollouts.
- Select the plan that matches your rollout timeline and click Next.

-
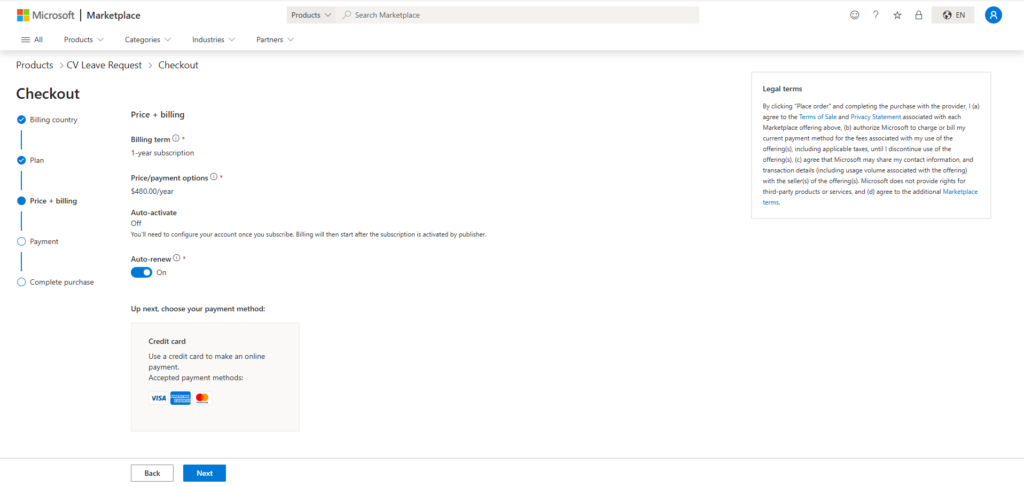
Step 4: Review Pricing & Billing Details
- Confirm the plan name, recurring price, auto-renew setting, and estimated taxes.
- Leave Auto-renew on unless finance has asked you to manage renewals manually.
- Click Next to continue to payment.
-
Step 5: Add Payment Details
- Enter a valid credit card or select an existing payment method saved to your Microsoft billing account.
- Provide the sold-to address if it is not pre filled.
- Click Save.

-
Step 6: Complete the Purchase
- Click Place order.
- After payment is processed, Microsoft redirects you to the Codevision activation landing page.
- You will see an on-screen confirmation once activation succeeds. Full features — unlimited leave types, unrestricted leave requests— are now available with no trial restrictions.
Part 4 — Upgrade the CV Classified Pro SharePoint App
- Open the tenant or site-collection App Catalog using one of the following URLs:
- https://[yourtenant].sharepoint.com/sites/appcatalog/_layouts/15/tenantAppCatalog.aspx/manageApps
- Or
- https://[yourtenant].sharepoint.com/sites/[yoursitecollection]/AppCatalog/Forms/AllItems.aspx
- Go to classic experience (skip this if already open classic experience)
- Search “CV Leave Request” & Select from grid
- Click on files from top header menu.

- Click Upgrade Store App options from App (If any upgrade version available it will enable)
- Wait for upgrading process.
- Once done deploy option will be visible. Review any pending additional API permission approval. (Refer step 2 from Part 1 — Deploy the CV Leave Request SharePoint App )
- Click on deploy. It will redirect back to app catalog once process done
- Go to site page where webpart installed & check upgraded feature.
Support
- For technical assistance, feature requests, or questions about pricing and licensing, contact
Codevision Technologies Private Limited through one of the following channels:- Email: support@thecodevision.com
- Web: https://thecodevision.com/
- AppSource listing: search for “CV Leave Request” on Microsoft AppSource and use the Contact Publisher link.